Ever dreamed of crystal-clear sound pulsating through your car? A new car stereo can make that a reality, but the installation can seem daunting. One of the biggest hurdles? Deciphering the web of wires hiding behind your dashboard. Understanding car stereo wiring color codes is the key to a smooth and successful installation.
Connecting a car stereo is more than just plugging in a few wires. Each wire serves a specific purpose, and incorrect connections can lead to malfunctions, blown fuses, or even damage to your stereo. This guide will illuminate the intricacies of car stereo wiring color codes, empowering you to take control of your car audio destiny.
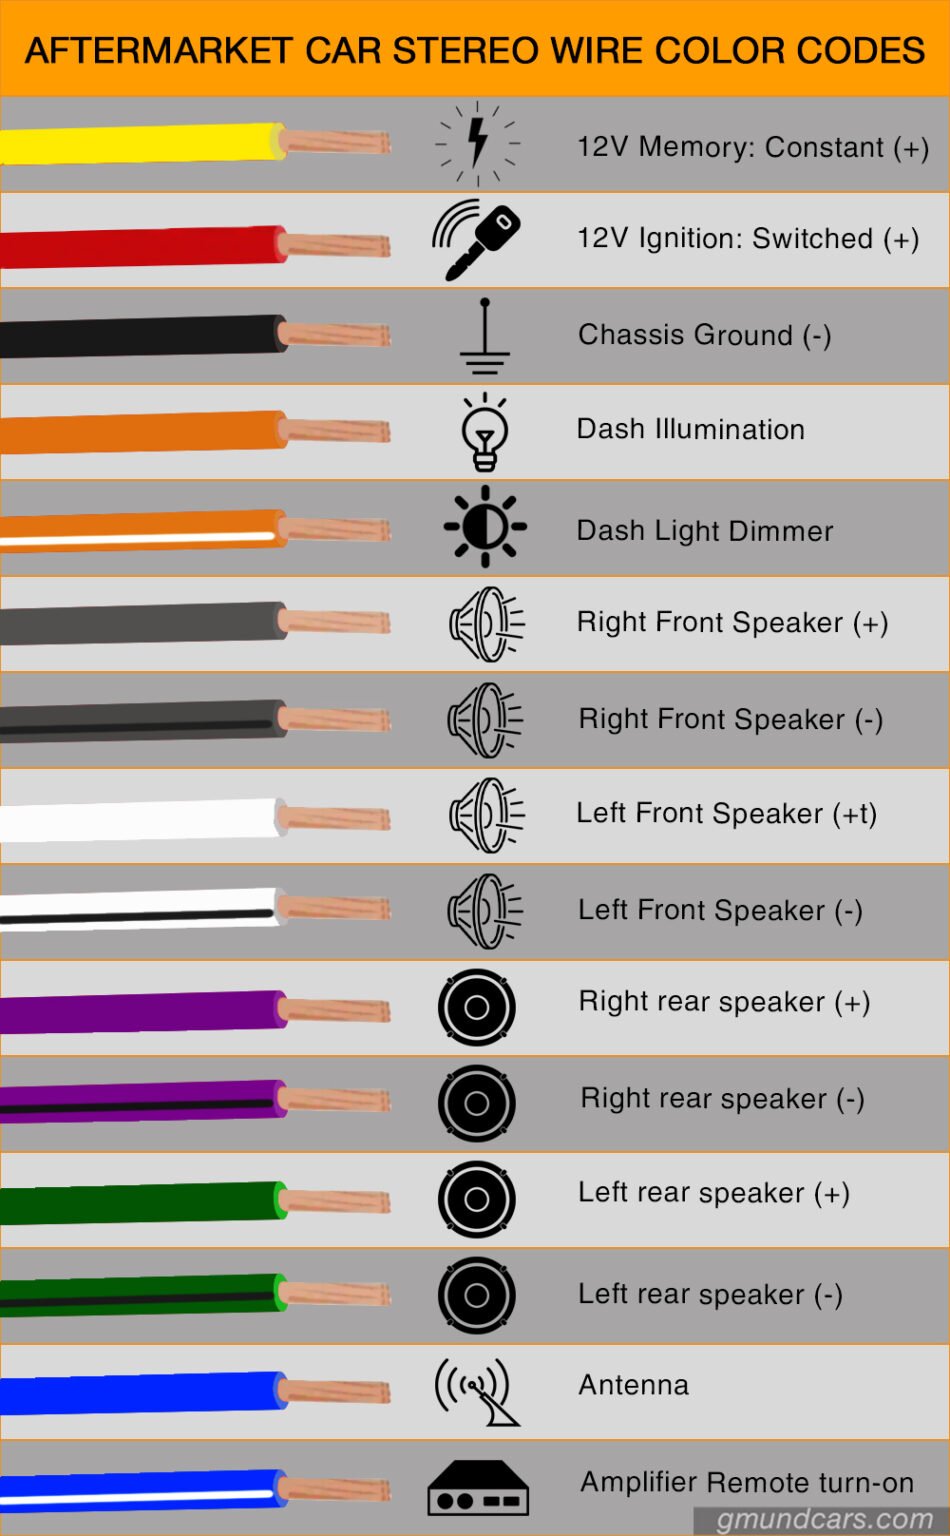
The standardized color-coding system for car stereo wiring simplifies the installation process. These codes act as a universal language, making it easier to identify the function of each wire without needing to consult complex wiring diagrams for every vehicle. While there can be slight variations between manufacturers, the core colors and their corresponding functions remain remarkably consistent.
The history of car stereo wiring color codes is rooted in the need for standardization within the automotive industry. As car stereos became increasingly popular, the need for a simple and consistent wiring system emerged. This standardization not only simplified installation for professionals but also empowered car owners to tackle installations themselves. These color codes have become an integral part of car audio installation, ensuring compatibility between different stereo brands and vehicle models.
Understanding these color codes is crucial not only for successful installations but also for troubleshooting existing car audio problems. Identifying a faulty wire or connection becomes significantly easier when you know the function of each wire based on its color. This knowledge can save you time and money on repairs, and empowers you to maintain your car audio system.
For instance, the constant 12V power wire, typically yellow, supplies continuous power to the stereo's memory, preserving your radio presets and other settings. The ignition wire, often red, provides power to the stereo when the car's ignition is switched on. Black represents ground, essential for completing the electrical circuit. Speaker wires come in pairs, usually with a solid color and a striped counterpart, to distinguish positive and negative connections.
One of the benefits of understanding car stereo wiring color codes is the ability to troubleshoot problems effectively. If your stereo isn't powering on, you can quickly check the yellow and red wires for proper connection. If only one speaker is working, examining the corresponding speaker wires can help pinpoint the issue.
Another advantage is the ease of upgrading or replacing your car stereo. With a clear understanding of the color codes, you can confidently disconnect the old stereo and connect the new one, saving on professional installation costs.
Furthermore, knowing these codes allows you to customize your car audio setup. You can add amplifiers, subwoofers, and other components with confidence, ensuring correct wiring and optimal performance.
To successfully wire your car stereo, gather the necessary tools, including wire strippers, crimpers, and electrical tape. Consult your car stereo and vehicle's wiring diagrams for specific color code variations. Carefully connect each wire according to the color codes, ensuring secure connections and proper insulation.
Advantages and Disadvantages of Using Standard Color Codes
| Advantages | Disadvantages |
|---|---|
| Simplified installation | Potential variations between manufacturers |
| Easier troubleshooting | Requires basic understanding of car electrical systems |
| Cost-effective DIY installations | Risk of damage if wires are connected incorrectly |
Best Practice: Always disconnect the car's battery negative terminal before working on any car stereo wiring to prevent electrical shocks or damage to the stereo.
FAQ: What if my car's wiring colors don't match the standard codes? Consult your vehicle's wiring diagram or use a multimeter to identify the function of each wire.
Tip: Use a wiring harness adapter to simplify the connection process and avoid cutting your car's original wiring.
In conclusion, mastering car stereo wiring color codes unlocks a world of car audio possibilities. From simple stereo replacements to complex custom installations, understanding these codes empowers you to take control of your car's sound system. While the initial learning curve might seem intimidating, the benefits of simplified installation, easier troubleshooting, and cost savings make the effort worthwhile. Take the time to familiarize yourself with the standard color codes, consult your vehicle’s wiring diagram, and don’t hesitate to seek assistance from online resources or experienced car audio enthusiasts. By equipping yourself with this knowledge, you can transform your car into a personalized concert hall, enjoying your favorite music on the open road. So, take the plunge, explore the world of car audio, and elevate your driving experience with the perfect soundtrack.
Color Car Stereo Wiring Diagram - The Brass Coq
Honda Civic Stereo Wiring Colors - The Brass Coq
Car Stereo Wiring Harness Color Codes - The Brass Coq
Car Stereo Wires Color Code - The Brass Coq
Aftermarket Stereo Wiring Colors - The Brass Coq
Car Audio Wire Color Codes - The Brass Coq
Car Stereo Wiring Colors - The Brass Coq
Audi Radio Wiring Harness Color Code - The Brass Coq
Car Stereo Power Wire - The Brass Coq
wire a car stereo color codes - The Brass Coq
How To Wire Aftermarket Car Stereo - The Brass Coq
Home Stereo System Design Using Car Head Unit - The Brass Coq
Car Stereo Output Diagram - The Brass Coq
Car Wiring Color Codes - The Brass Coq
Aftermarket Stereo Wiring Colors - The Brass Coq


